
데이터 준비
data/index.js
export default [
    {
        writer: '카리나',
        title: '에스파',
        content: '존예'
    },
    {
        writer: '윈터',
        title: '에스파',
        content: '졸귀'
    }
]
원래는 DB에서 데이터를 받아와야하지만, 간단하게 데이터를 만들어놓고 import하는 방식으로 구현
READ
components/Read.vue
<template>
    <div>
        <table>
            <tr v-for="(value,i) in data" :key=i>
                <td>{{ value.writer }}</td>
                <td>{{ value.title }}</td>
                <td>{{ value.content }}</td>
            </tr>
        </table>
    </div>

</template>

<script>
import data from '../data/index.js'
export default {
    name: 'Read',
    data() {
        return {
            data: data
        }
    },
}
</script>script에서 import를 통해, data/index.js파일의 데이터를 가져오는 것을 볼 수 있다.
받아온 데이터를 변수로 지정해서 template에서 v-for을 이용해 테이블로 나열
router.js
import Read from "./components/Read";

const router = new VueRouter({
    mode: "history",
    routes: [
        {
            path: "/",
            name: "Read",
            component: Read
        },
    ]
});components를 만들었으니, 라우팅 설정을 해준다.
기본경로일떄에는 Read 컴포넌트를 보여주도록
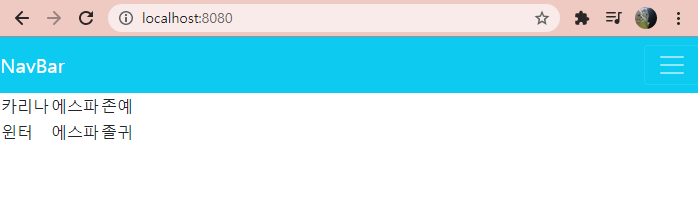
서버를 실행시키면, 사진 처럼 데이터를 잘 불러오는 것을 확인 가능
Create
components/Read.vue
<button @click="write">글쓰기</button>


methods: {
        write() {
            this.$router.push({
                path: 'create'
            })
        }
}Read.vue파일에 글쓰기로 이동할 수 있는 버튼과, 버튼을 눌렀을 때 onClick을 통해서 라우팅 시킬 수 있도록 하는 함수를 추가
components/Create.vue
<template>
    <div>
        <input type="text" placeholder="글쓴이" v-model="writer" />
        <input type="text" placeholder="제목" v-model="title"/>
        <textarea name="" id="" cols="30" rows="10" placeholder="내용" v-model="content"></textarea>
        <button @click="write">작성</button>
    </div>
</template>

<script>
import data from '@/data'
export default {
    name: 'Create',
    data() {
        return {
            data: data,
            writer: "",
            title: "",
            content: ""
        }
    },
    methods: {
        write() {
            this.data.push({
                writer: this.writer,
                title: this.title,
                content: this.content
            })
            this.$router.push({
                path:"/"
            })
        }
    }
}
</script>input과 textarea 태그를 이용해서 글 정보를 받아올 수 있도록
그리고 v-model을 이용해서 양방향 렌더링이 가능하도록 한다.
작성버튼을 누르면, 해당 글정보를 만들어논 data/index.js 파일에 추가되도록 write함수를 작성
그리고 글 작성이 끝나면, 다시 read 컴포넌트로 돌아갈 수 있도록, 라우팅을 해준다.
Route.js
import Create from "./components/Create";

const router = new VueRouter({
    mode: "history",
    routes: [
        {
            path: "/",
            name: "Read",
            component: Read
        },
        {
            path: "/create",
            name: "Create",
            component: Create
        },
    ]

});라우팅 파일도 설정을 해주고
URL = locathost

URL = locathost/create
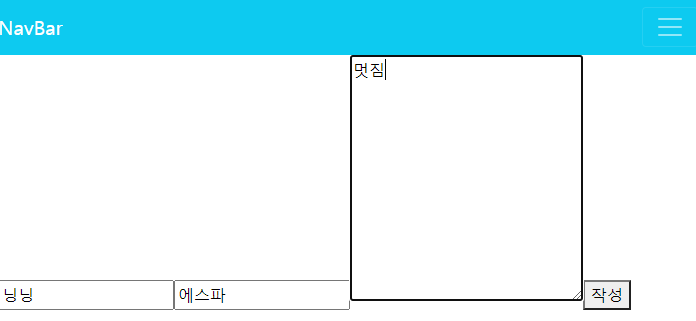
글을 작성한다
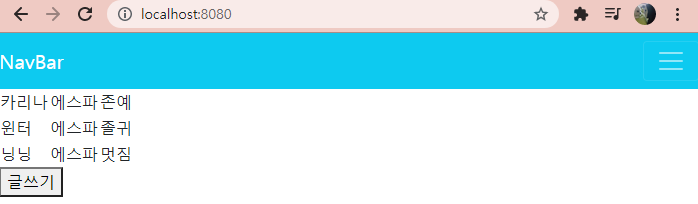
글작성이 끝나면, 다시 Read 화면으로 돌아오고, 새롭게 추가한 글이 렌더링된 것을 확인할 수 있다.
'IT 공부 > Vue' 카테고리의 다른 글
| [ Vue ] 형제 컴포넌트간의 통신하는 방법 (0) | 2022.12.01 |
|---|---|
| [ Vue.js ] 문자열을 코드로 인식하게 하기 (0) | 2021.08.17 |
| [ Vue.js ] ref 속성을 이용한, 태그 가져오기 (0) | 2021.08.17 |
| [ Vue.js ]데이터의 속성값 가져오는 법 (0) | 2021.08.17 |
| [ Vue.js ] 게시판만들기 (Update, Delete) (1) | 2021.08.05 |